
BONUS: 7 Odds Enhancers For Every Level Track-Back Trade
Never Trade Alone Again

7 Odds Enhancers Coming Together
Never Trade Alone Again
First Rule of Trading: Never Trade Alone.
No, not physically — we’re not talking about needing a buddy beside you. We’re talking about your setups.
Never enter a trade based on a single signal.
One candle? One oscillator? One trendline?
That’s not trading — that’s guessing.
You need confluence.
You need confirmation.
You need friends in your trade.
Just because RSI dips below 60 doesn’t mean it’s time to short.
Just because we’re trending doesn’t mean we buy every Fib pullback.
The edge is never in one thing — it’s in the combination of things working together.
So here are the 7 odds enhancers I use in every Level Track-Back (LTB) trade.Let’s break down the 7 I look for in every trade.
Odds Enhancer #1: The Level — Quality & Exit Potential
A true supply or demand level shows clear accumulation or distribution — followed by an explosive move away.
Take this Drop-Base-Drop pattern in crude oil. The base is tight. The drop is strong. The level itself is clean.

Ask yourself:
Could I personally move oil 2% in a few hours?
Nope. But institutions can — and do.
That’s your clue. Institutional footprints create the best levels.
What makes a high-quality, institutional-grade level?
Tight structure (no wicks, narrow range)
Less than 5 candles in the base
Strong impulse that breaks prior highs/lows
Formed during high-volume trading hours
And don’t forget — your exit matters too. Great levels leave structure behind that tells the story.
Odds Enhancer #2: The Approach Into the Level
The approach matters just as much as the level itself.
You want clean, aggressive approaches — not slow leaks.
If price grinds toward your level, it's likely already absorbing the orders you're counting on. That weakens the reaction zone.
We want:
Direct moves into the level
Momentum behind the approach
No stalling, no chop, no front-running by retail
Think of it like a trap: it only works if the prey walks into it clean.
A stair-step move into the level = lower odds.
Let’s use the same example:
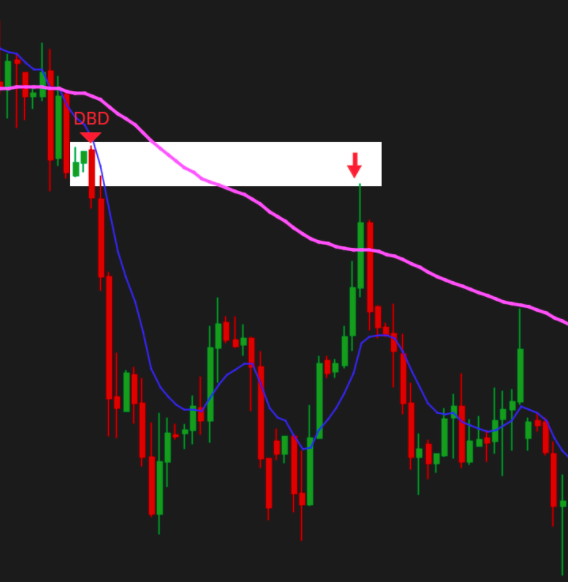
Here focus on the approach into the level.
It’s strong.
That’s what we want.
Here’s why…
If price stalls before your level, retail sellers can start front loading the orders at your level. This eats up the pressure inside the level.
If you stall before you’re level, the level is likely to fail.
Why?
All that time price spends getting close to the level, its absorbing some of the orders into the zone. It’s forms a continuation pattern because of this.
As price fluctuates into the level, ready buyers or sellers self fulfill their bullish or bearish positions by adding to them. As more orders are filled into the level, the less amount of orders will be sitting there at the level.
Remember, all price is is buyers and sellers engaging. If price looks like it’s going to continue, it usually does.
Odds Enhancer #3: RSI Rules In Play
We don’t use RSI the standard way. Forget "overbought" and "oversold." That language doesn’t help real-world decision-making.
Instead, we focus on RSI zones:
Above 60 → trend momentum is likely to continue upward
Below 40 → trend momentum is likely to continue downward
So:
If RSI > 60 and we hit a supply level — lower odds of success
If RSI < 40 and we hit a demand level — lower odds of success
We’re not saying it won’t work. We’re saying it probably won’t lead to new lows or new highs without struggling first, which means risk:reward gets crushed.
This simple rule saves trades from turning into traps.
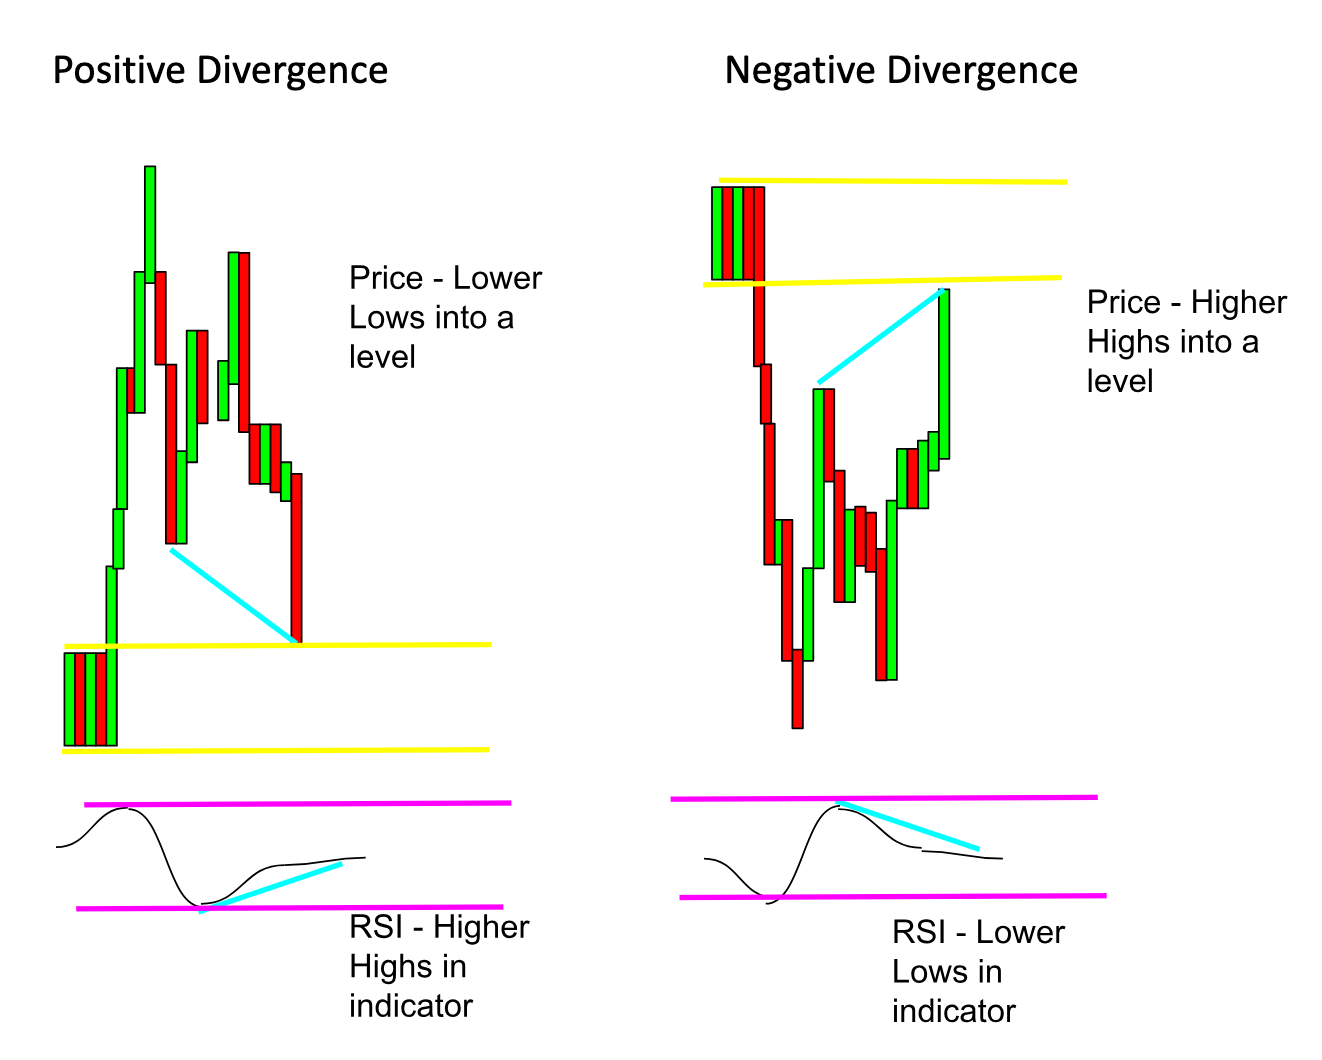
Odds Enhancer #4: RSI Divergence
Divergence is one of my favorite tools — but only when it’s in the right place.
We use RSI to spot shifts in momentum. When price is making higher highs but RSI is making lower highs (or vice versa), something is breaking down under the surface.
But here’s the key:
Divergence means nothing unless it’s happening into a level.
✅ Divergence into a level = signal
❌ Divergence in the middle of nowhere = noise
Positive divergence into demand = strong odds enhancer
Negative divergence into supply = strong odds enhancer
Divergence without structure is a trap. But divergence + level = edge.
Here’s what you want to look for:
Odds Enhancer #5: 8/89 EMA — First Test Only
We use one moving average strategy as confluence.
Just one.
The 8/89 EMA combo.
Here’s how it works:
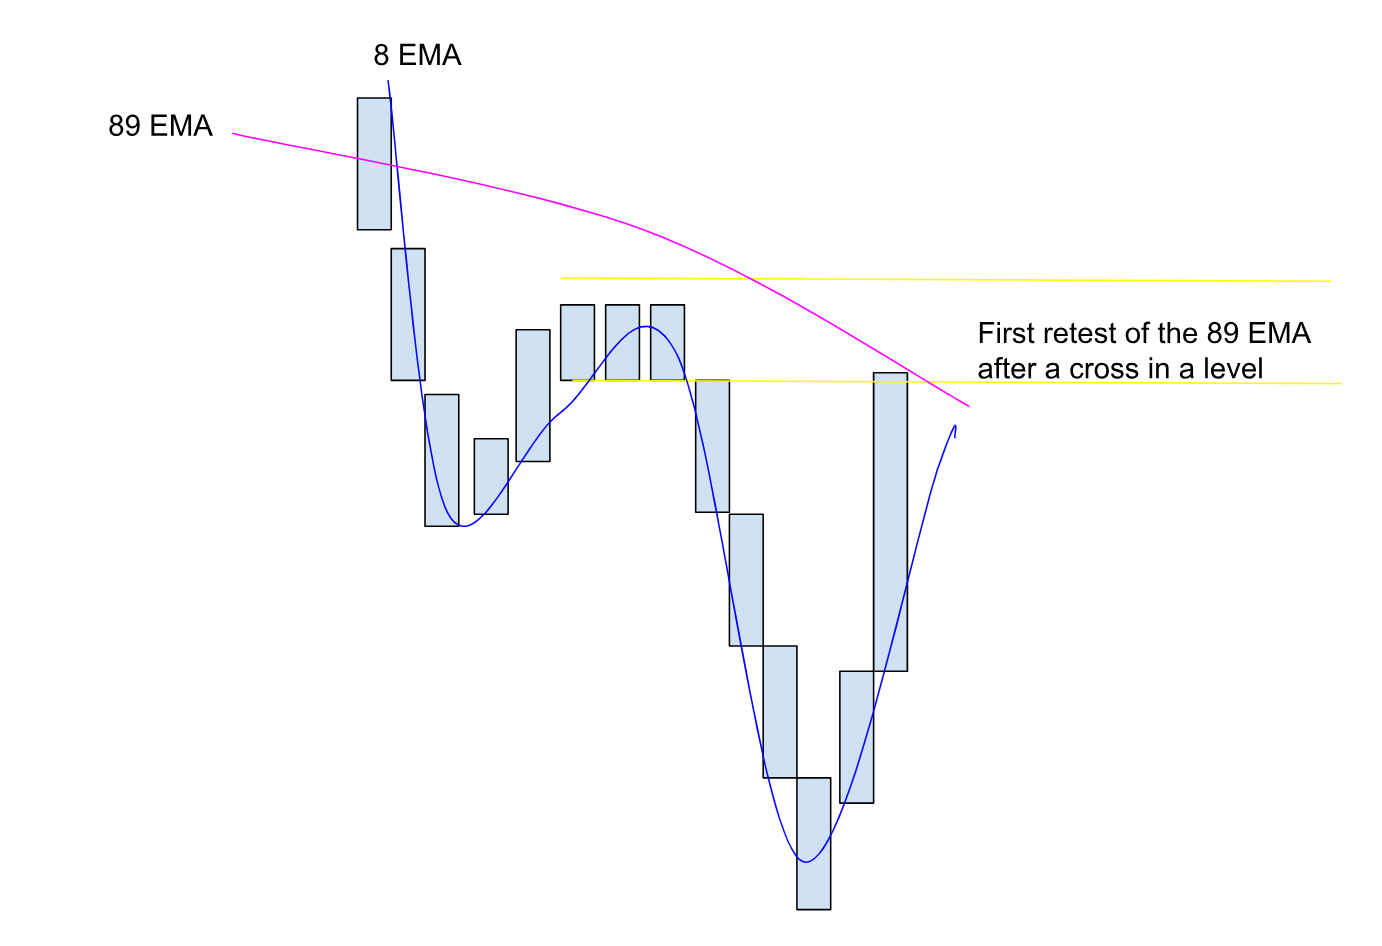
Place the 8 EMA and 89 EMA on your chart
Look for the first test of the 89 EMA after a strong move
Confirm that the 8 has not crossed the 89 into the level
Add RSI confluence (above 40 for longs, below 60 for shorts)
It’s best used on the 45Min + charts and I personally only use at supply/demand zones for LTB trades. It looks like this when going long:
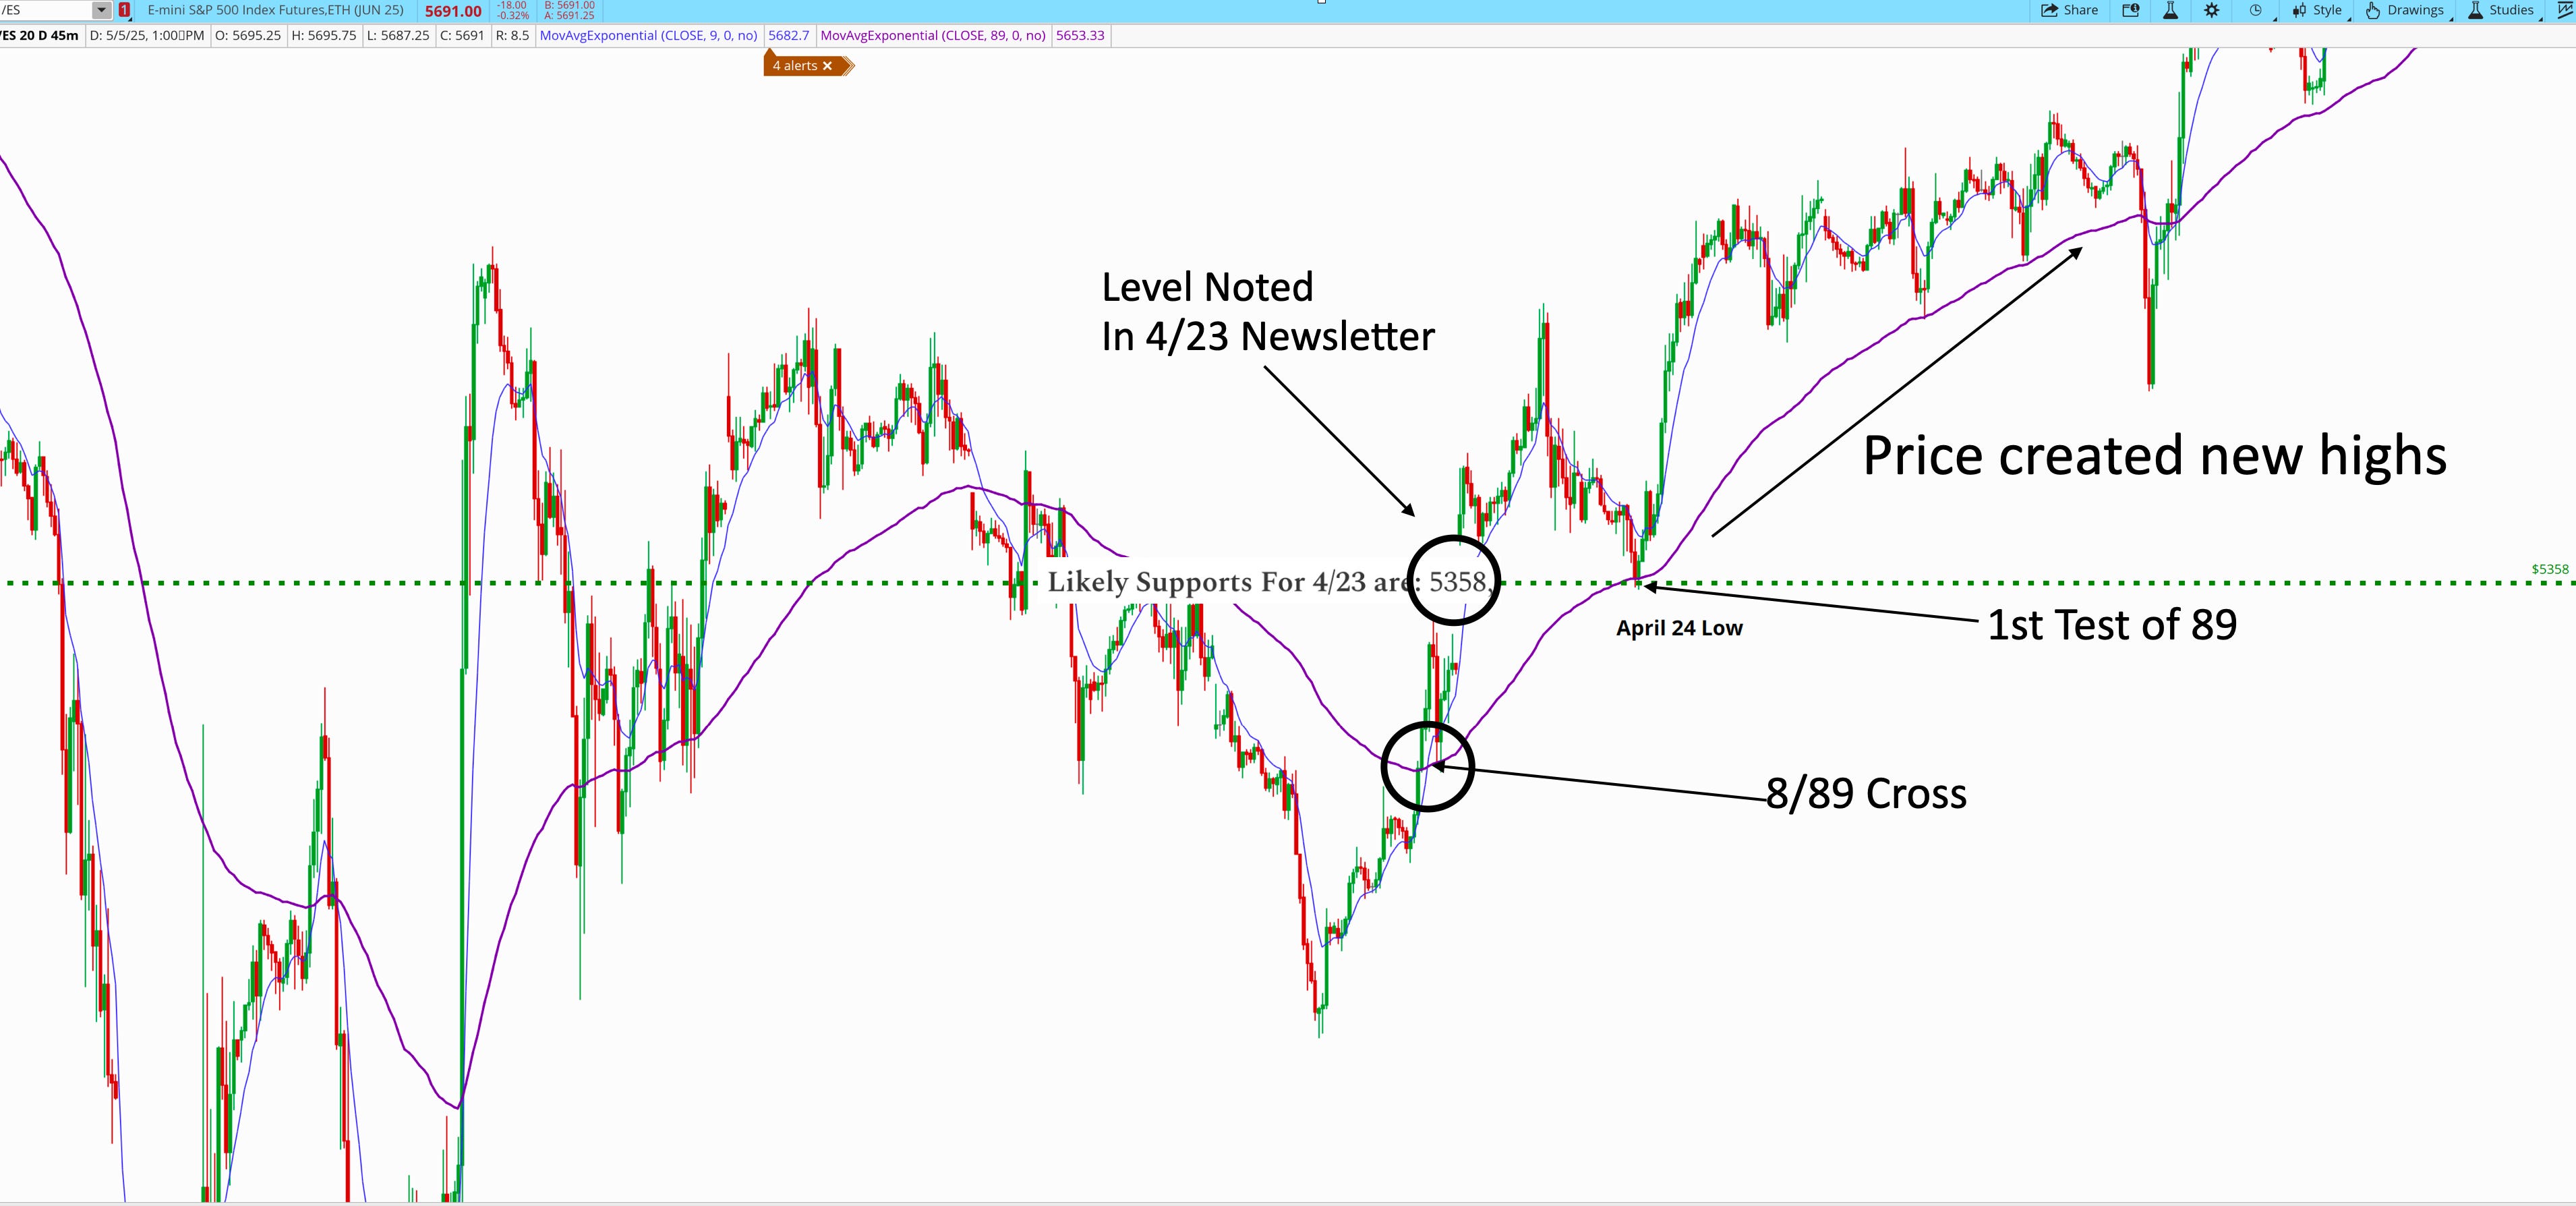
First touch = highest probability.
Second or third = less strong of a signal.
This setup works beautifully when combined with levels and RSI.
When going short - Just the Opposite
We’re looking to buy when the price retests the 89 EMA for the first time.
We want to buy so long as the 8 period EMA doesn’t cross the 89 when entering the level.
Add in RSI below 60 for confluence to this strategy
This type of setup must take place when price is headed into a level (for getting short, either a rally base drop or a drop base drop)
It looks like this:
That’s our 8/89 EMA strategy and how we use it. It’s the only moving average strategy we use.
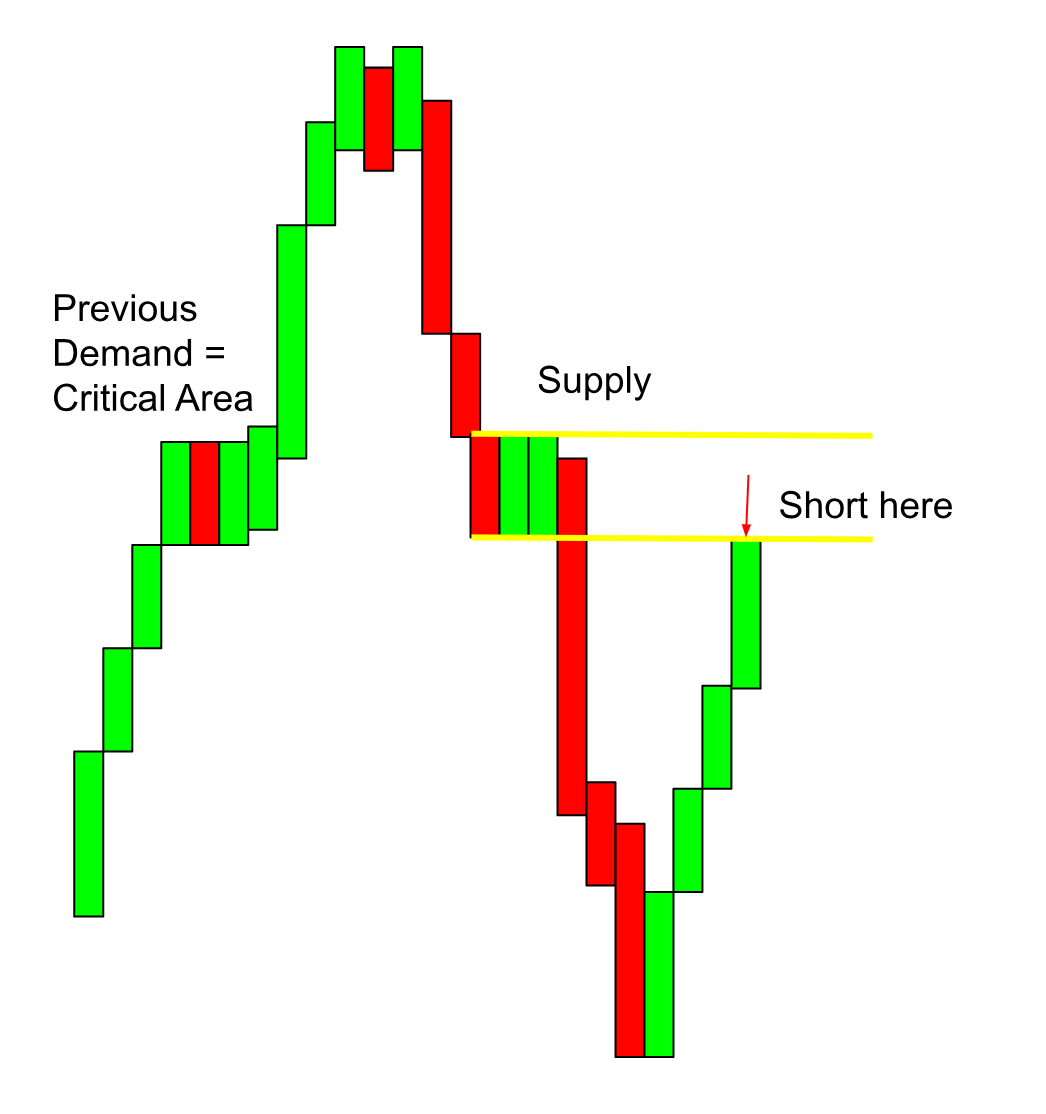
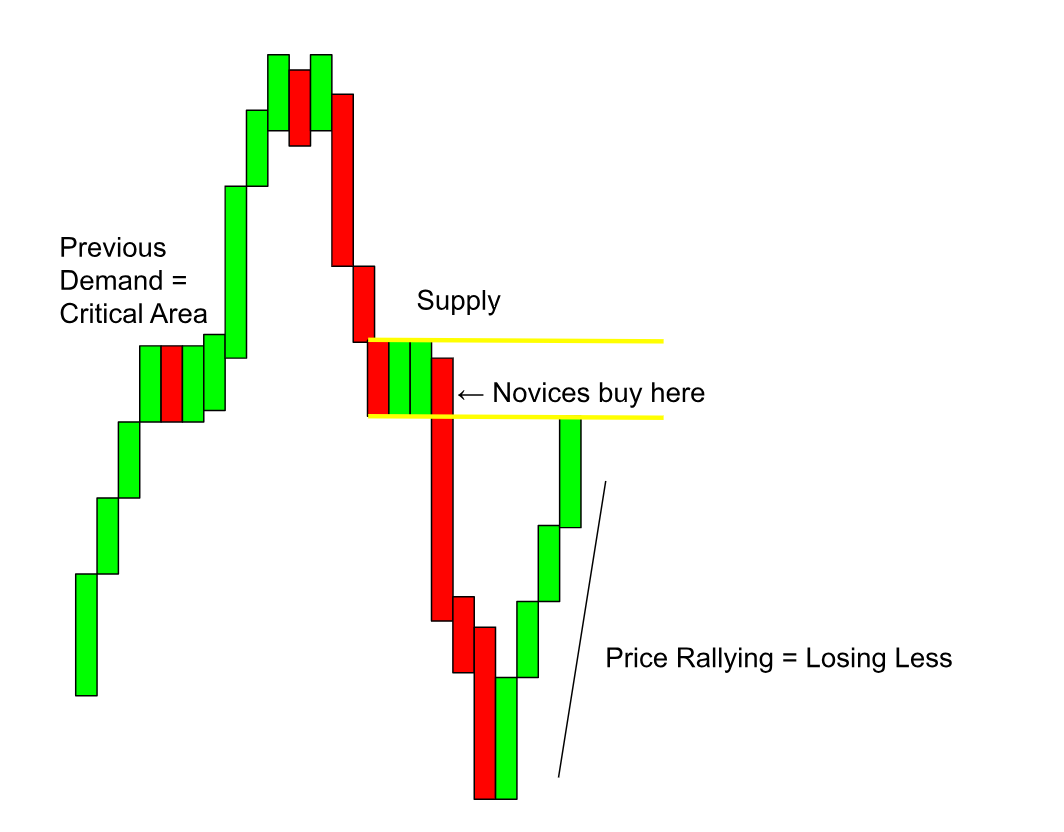
Odds Enhancer #6: Previous Critical Areas
Old levels don’t die — they come back as magnets.
We’re talking about:
Former supply turning into demand
Former demand flipping into supply
Why do these matter?
Because price has memory. And traders have emotions.
Let’s say a trader got long from a demand zone, only to watch price break lower. When price comes back up, they’ll often sell just to “get out even.”
Multiply that by thousands of traders?
That’s resistance.
That’s emotion on a chart.
These zones work because of psychology.
They’re self-fulfilling.
And they’re some of the best confluence zones you’ll find.
There’s a few reasons why these critical areas work.
Here’s why:
Let’s say a trader was a buyer when price came back into the “previous demand area.”
But price, instead of price going in that traders direction, price continues to go down.
Demand failed.
Whatever the reason, price stalled and then continued lower and now the trader is in a losing position.
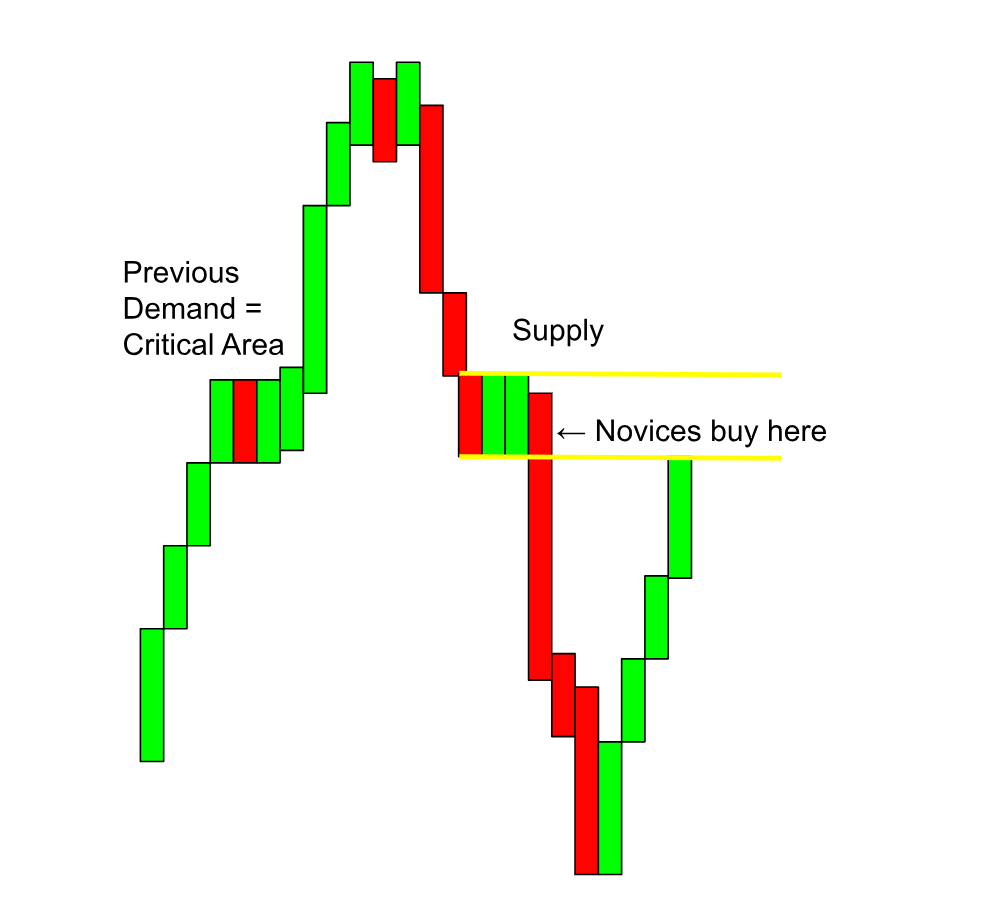
Here’s where the emotion comes in.
As novice trades become in a “less losing position” they begin to say things like “if I can just break even I saved myself from a big loss.”
Thousands of traders sell on this thought and it becomes a self fulfilling prophecy.
Meanwhile we’d like to engage in a short here if everything else aligns.
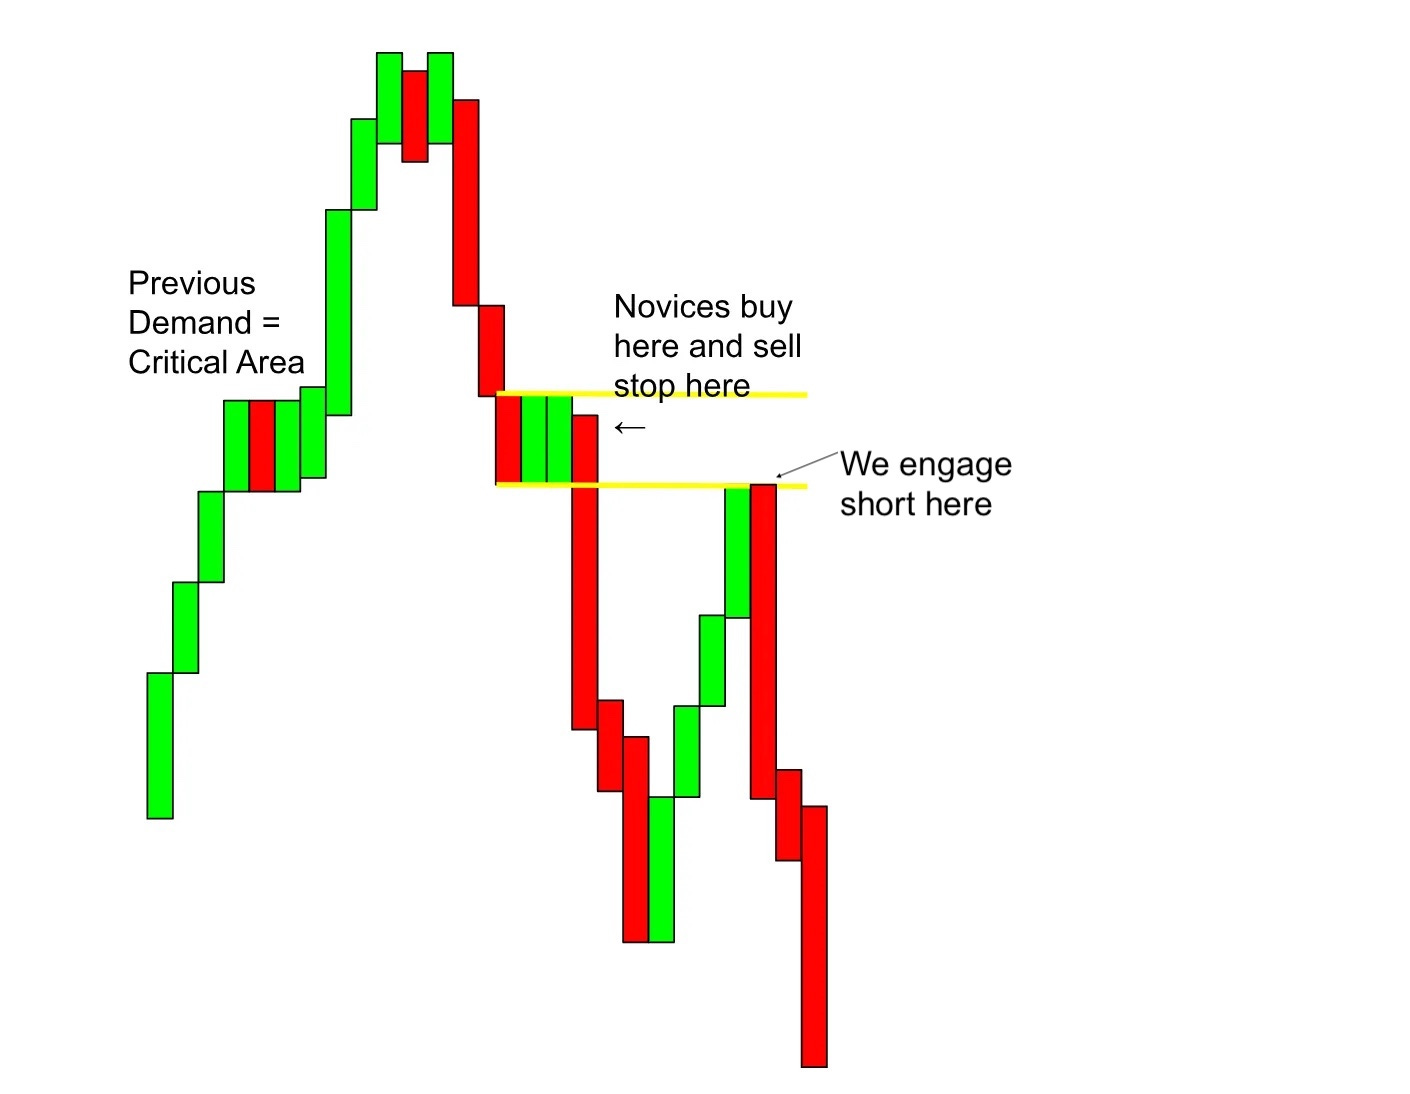
Again, thousands of traders sell on this thought, and they pat themselves on the back for such a “prudent” decision.
In reality, their actions participate in the move down.
It’s a self fulfilling prophecy.
Odds Enhancer #7: Trading With the Trend
Yes, the cliché is true: the trend is your friend.
But you have to define it correctly.
Here’s how we do it:
Uptrend = Higher highs + higher lows
Downtrend = Lower highs + lower lows
Then we look at 3 timeframes:
Timeframe Role
Low (e.g. 15min) Entry/exit levels
Intermediate (e.g. 1hr–4hr) Defines trend
High (e.g. Daily) Reversal zones
You’ll often find clean entries on the LTF that align with trend structure on the ITF, while the HTF defines the big picture.
And that’s how we align price, structure, momentum, and time.
Again, people are fairly simple creatures when it comes to the following emotions:
-Greed
-Fear
-Desire
-Hope
-Despair
-Anxiety
On a price chart these emotions show up in the form of impulses and corrections.
Impulses are sharp, fast moving candles that cover large distances relative to previous candles. Typically in an impulse upwards, all the candles would be green. If the impulse was downwards they’d be red. Additionally, impulses generally arise in the direction of the trend. These impulses create new highs in upward trending markets and new lows in downward trending markets.
Corrections are slower moving, less quantity of candles, move against the overall trend. Corrections have variable candles (red and green) and are relatively small in size compared to the trend impulses. Very rarely are support or resistance areas breached because of a correction.
Final Word
None of these odds enhancers work alone. They weren’t designed to.
They work best when layered. When multiple tools say the same thing at the same time.
That’s confluence.
And confluence is what separates professional trades from coin flips.
So the next time you’re thinking about hitting buy or sell — count the enhancers.
If you’ve only got one, you’re trading alone.
And no one trades well alone.